
  • About Us
    • Our Team
    • Meet the Provost and Executive Vice President
    • Messages From the Provost
    • Organizational Chart
  • Faculty Resources
  • Contact Us
  • DIRECTORY
  • MAPS
  • MYUTRGV
  • NEWS
  • GIVE
UTRGV home
The University of Texas
Rio Grande Valley
  • DIRECTORY
  • MAPS
  • MYUTRGV
  • News
  • GIVE
Open Search Menu
Menu
UTRGV Trademark Logo
Office of the Provost
  • About Us
    ▼
    About Us Square placeholder image 300px
    • About Us
      • Our Team
      • Meet the Provost and Executive Vice President
      • Messages From the Provost
      • Organizational Chart
  • Faculty Resources
  • Contact Us

Adding a Course Requirement

  1. Home
  2. Digital Solutions
  3. Roadmap Portal
  4. Adding a Course Requirement
Digital Solutions Menu
Menu

Digital Solutions Menu

  • Reports and Dashboards
  • Roadmap Portal
    • Sign In and Access
    • Browsing and Viewing Roadmaps
    • Reference Tables
    • Editing a Roadmap
    • Adding a Course Requirement
    • The Five Requirement Types
    • Creating a New Roadmap
    • Catalog Year Rollover
    • Assigning Reviewers
    • Approving a Roadmap
    • Frequently Asked Questions
  • Roadmap Portal - Training
    • Onboarding: Start Here
    • Track: View Only
    • Track: Editor
    • Track: Manager
    • Track: Reviewer

Adding a Course Requirement

The seven-step wizard used to add or change any slot in a roadmap.

Open the wizard

  1. Click Add Slot above the slot table. An empty slot appears at the bottom of the list. To change an existing slot instead, skip this step.
  2. Scroll right on that slot's row and click the pencil icon. The wizard opens.
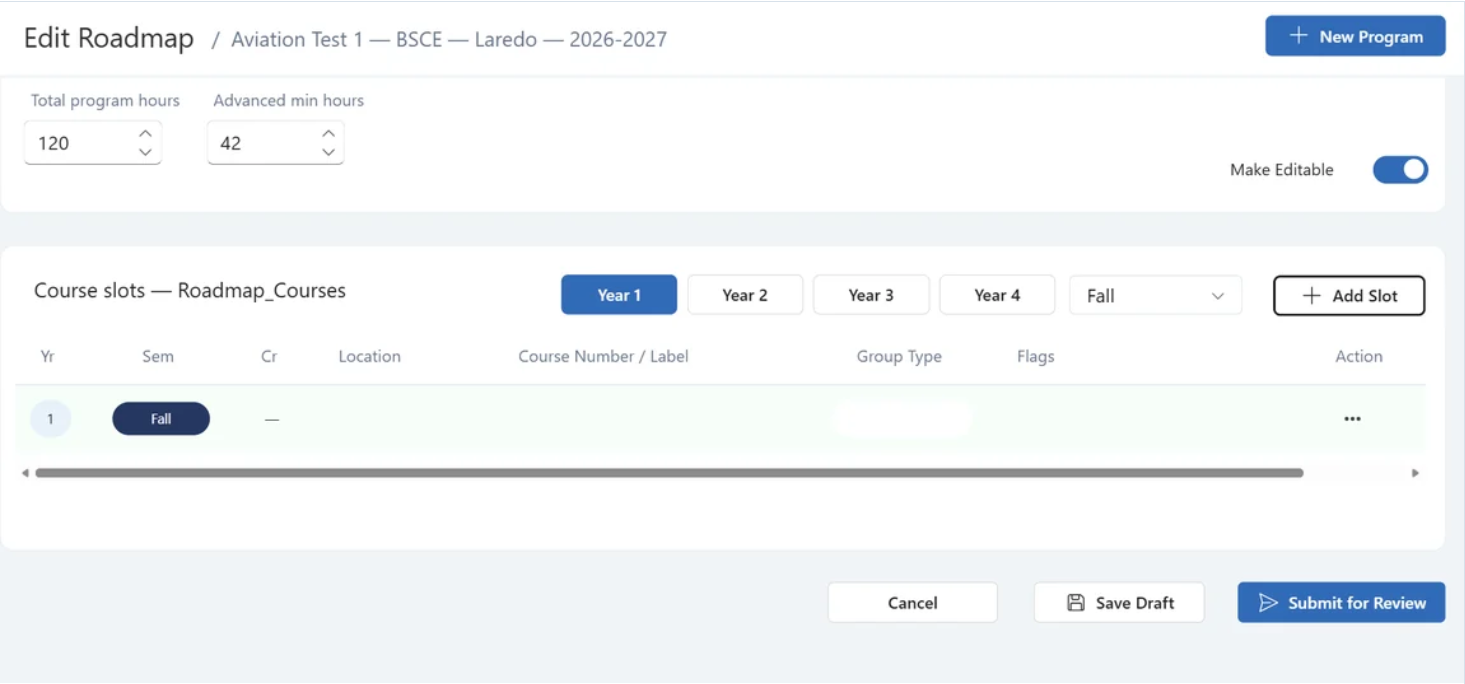
Editable roadmap showing the Course slots table with an Add Slot button above the table and a newly added empty slot row below.
The Add Slot button.

The seven steps

The steps are listed down the left side of the wizard. Work through them with Next; Back returns you a step.

The seven course requirement wizard steps and what to do in each step
Step What you do
1. Requirement Info Say where the requirement sits and what it is worth.
2. Requirement type Choose one of five types. This is the decision that shapes everything after it.
3. Choose courses Pick the actual courses. What you see depends entirely on step 2.
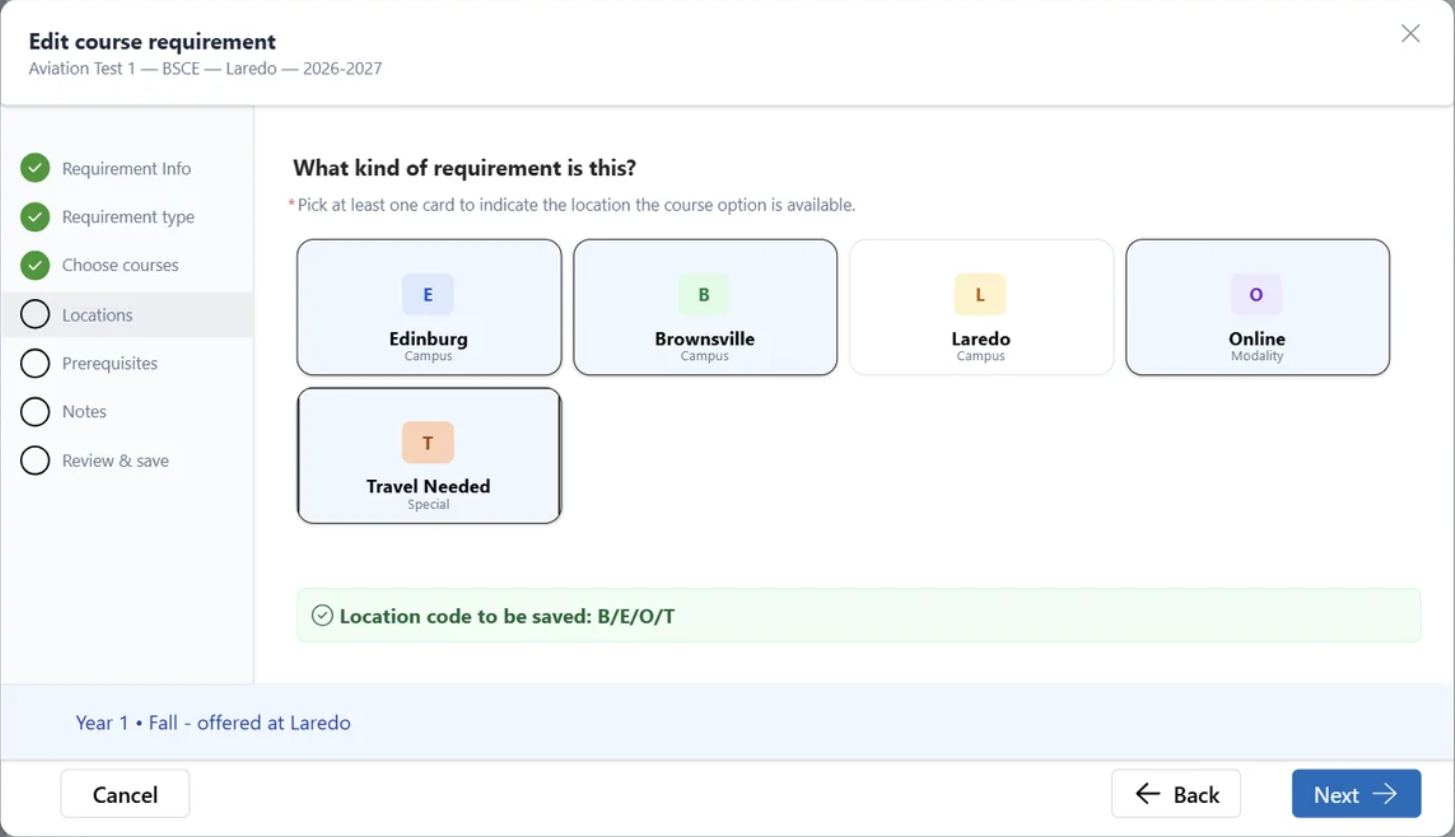
4. Locations Set the campuses and modality.
5. Prerequisites Select prerequisites as appropriate.
6. Notes Add any notes for students.
7. Review & save Check everything and submit.

Step 1 — Requirement Info

Titled Where does this requirement go? on screen. Program, catalog year and degree are inherited from the roadmap you are editing, so you only set the slot's own properties: Year, Semester, Expected applied credit hours, an optional Slot label, whether it is an elective, whether it is expected advance level, the Expected course level, and the Minimum grade required. Required fields are marked with a red asterisk.
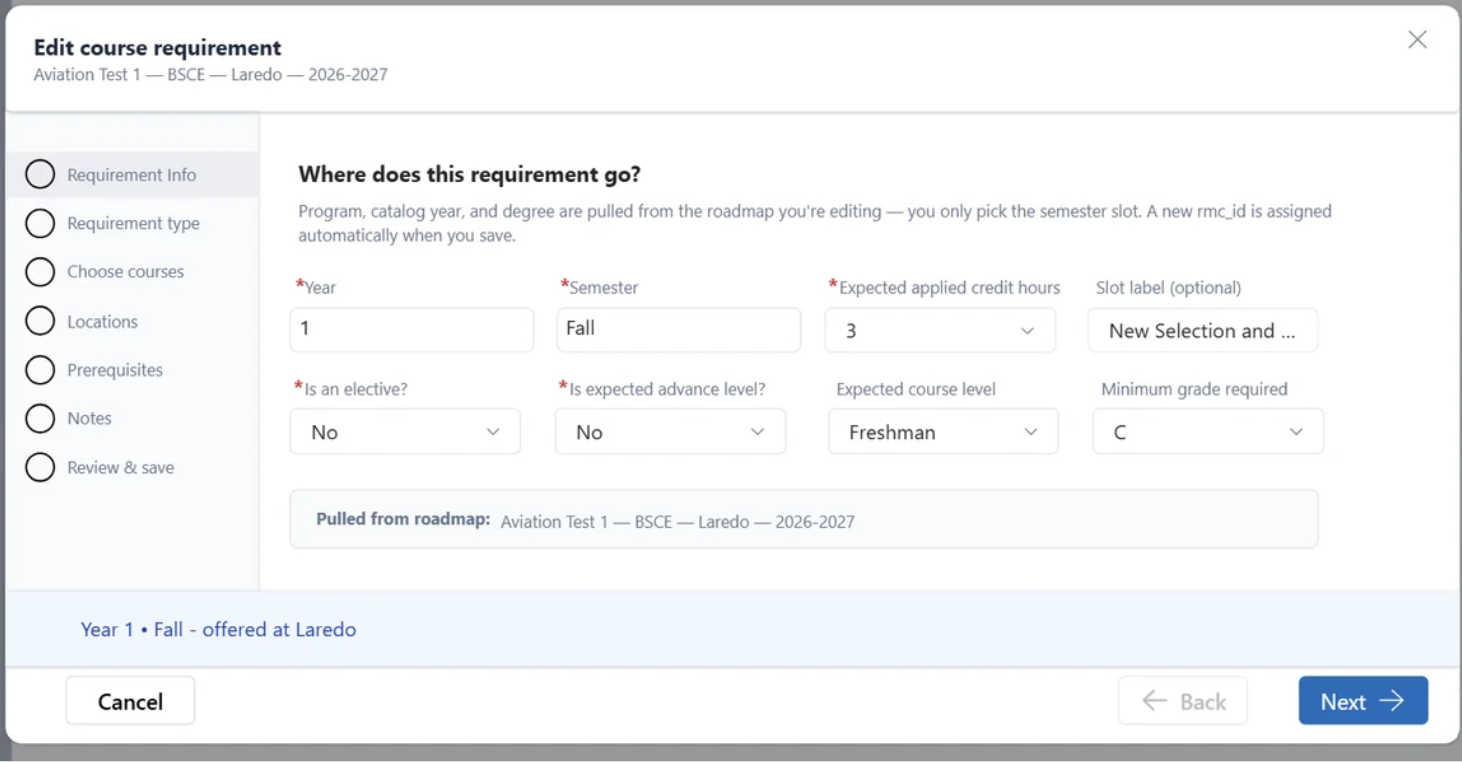
Step 1 of the Edit course requirement wizard, titled Where does this requirement go. Fields include Year, Semester, Expected applied credit hours, optional Slot label, elective status, expected advance level, Expected course level and Minimum grade required.
Step 1, Requirement Info.

Step 2 — Requirement type

Pick the card that matches what you want the student to do. Get this right and the rest of the wizard follows naturally.
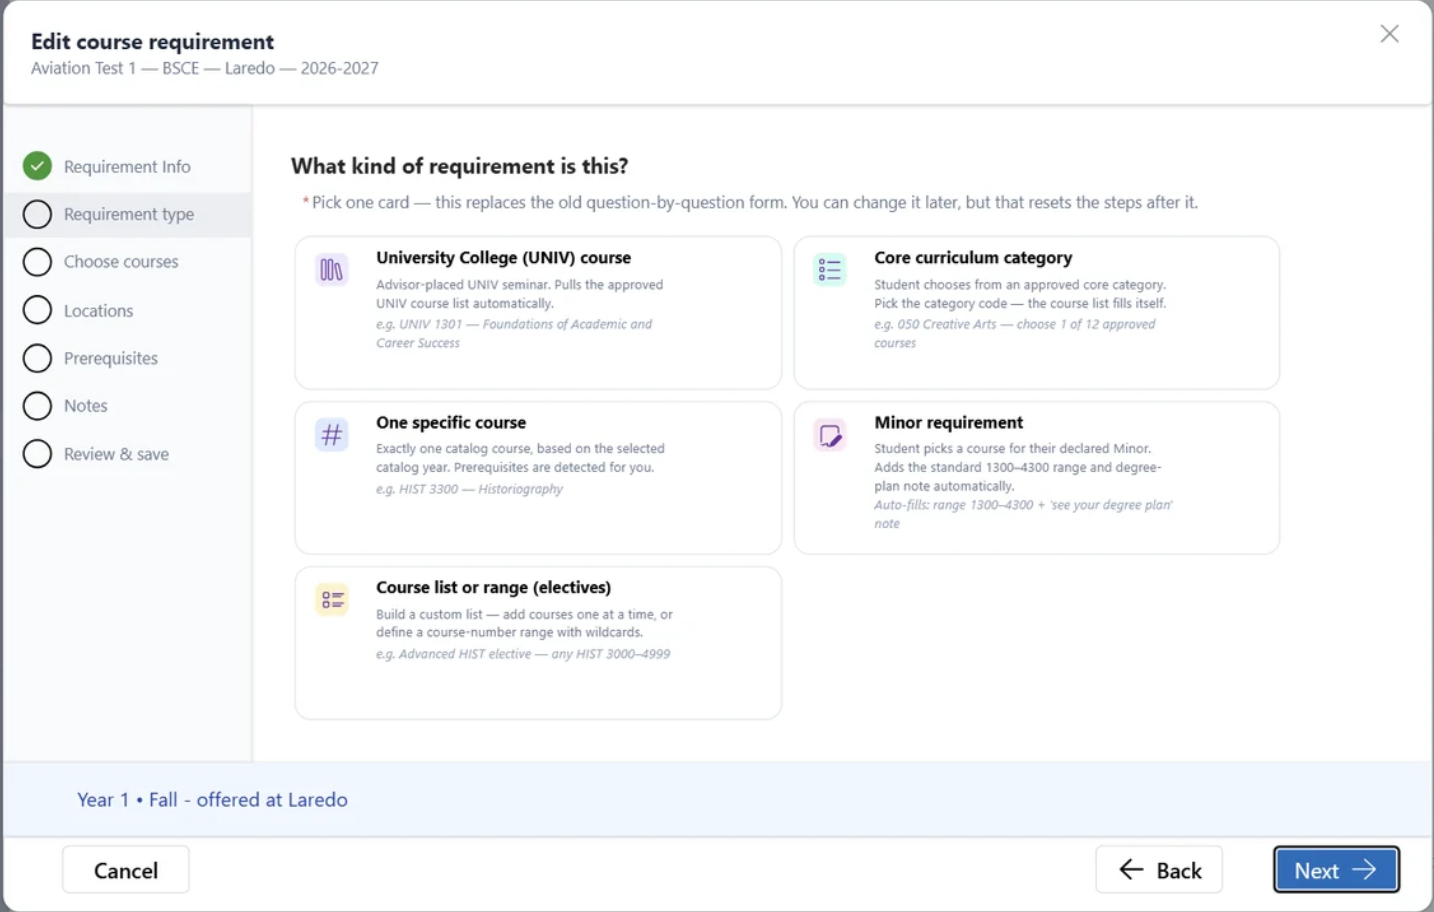
Step 2 of the Edit course requirement wizard asking What kind of requirement is this. Five choices are shown: University College UNIV course, Core curriculum category, One specific course, Minor requirement, and Course list or range electives.
Step 2. Choose one of five requirement types.
Decide before you move on. You can come back and change the requirement type later, but doing so resets every step after it.

Each type behaves differently at step 3. See The Five Requirement Types for a walkthrough of all five.

Steps 4 to 6

  • Locations. Indicate the campus or campuses where the requirement is offered, and the modality.
  • Prerequisites. Select prerequisites as appropriate for the courses in this slot.
  • Notes. Type any note students should see, then click Add note to table before continuing.
A note that has not been added to the table will not be saved. Always click Add note to table before moving on.
Step 4, Locations, in the Edit course requirement wizard. Location choices include Edinburg, Brownsville, Laredo, Online and Travel Needed. Multiple locations can be selected, and the selected location codes are shown before continuing.
Step 4, Locations.

Step 7 — Review and save

Check every step's entries, then submit. A confirmation message reads Course requirements added successfully.
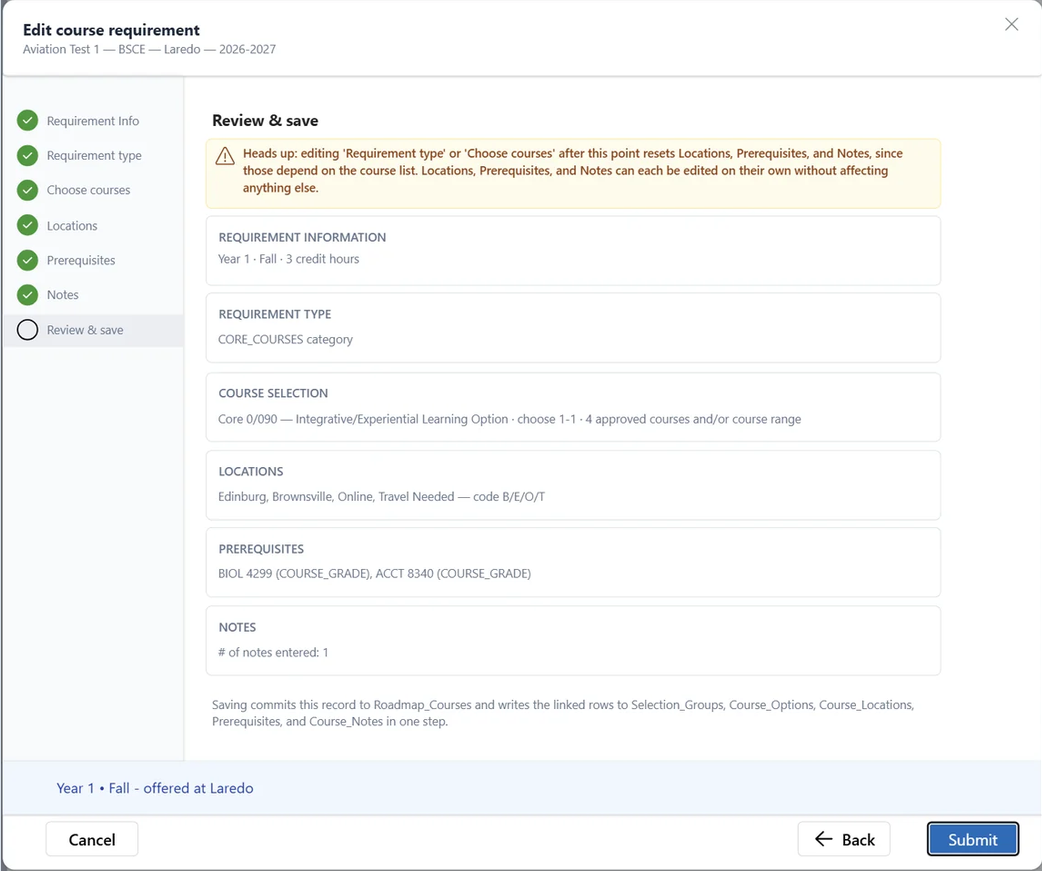

Step 7, Review and save, in the Edit course requirement wizard. A summary shows the requirement information, requirement type, course selection, locations, prerequisites and notes before the user selects Submit.
Step 7, Review and save.
Confirmation dialog with a check mark and the message Course requirement added successfully, followed by an OK button.
Confirmation that the requirement was saved.

Repeat this process for every slot, in every semester, of every year of the degree.

Previous

Editing a Roadmap

Next

The Five Requirement Types

Office of the Provost


Edinburg

Student Services Executive Building 5.101
1201 W. University Dr.
Edinburg, TX 78539
Phone: (956) 665-2111
provost@utrgv.edu

Brownsville

Life & Health Sciences Building 2.402
One West University Blvd.
Brownsville, TX 78520
provost@utrgv.edu

Find UTRGV on Social Media


LIKE. FOLLOW. SUBSCRIBE. ADD.


UTRGV Trademark logo
  • CARES, CRRSAA and ARP Reporting
  • Site Policies
  • Required Links
  • Accreditation Statement
  • Fraud Reporting
  • Senate Bill 18
  • Clery Act Reports
  • Web Accessibility
  • Mental Health Resources
  • Sexual Misconduct Policy
  • Reporting Sexual Misconduct
  • Contact UTRGV
  • 1-844-ATUTRGV
  • Facebook
  • X Twitter
  • Instagram
  • LinkedIn
  • Academics
  • Admissions
  • Cost and Financial Aid
  • Student Life
  • Search Programs
  • First-Year Students
  • Transfer
  • International Students
  • Graduate Students
  • Current Students
  • Faculty Resources
  • Staff Resources
  • UTRGV Careers
  • Visit Campus
  • Directory
The University of Texas Rio Grande Valley