
Need help?
For questions, assistance, or to report an issue, please contact the COLTT Help Desk at 956-665-5327 or 956-882-6792.
Browse Help Articles Submit a TicketScheduling your Zoom Meetings
Instructions
Note: If the Zoom tool link is not added to your course yet, please refer to the instructions on how to add Zoom to your course menu.
- Click on the "Zoom" or "Zoom Videoconferencing" link from your course menu.
- Click on "Schedule a New Meeting."
- Provide a topic/name for your session. Ex. Class Meeting, Office Hours, etc.
- Define when the meeting(s) occur by selecting the right time and dates. We highly recommend setting recurring meetings with specific days or using the "no fixed time" option under "Recurrence."

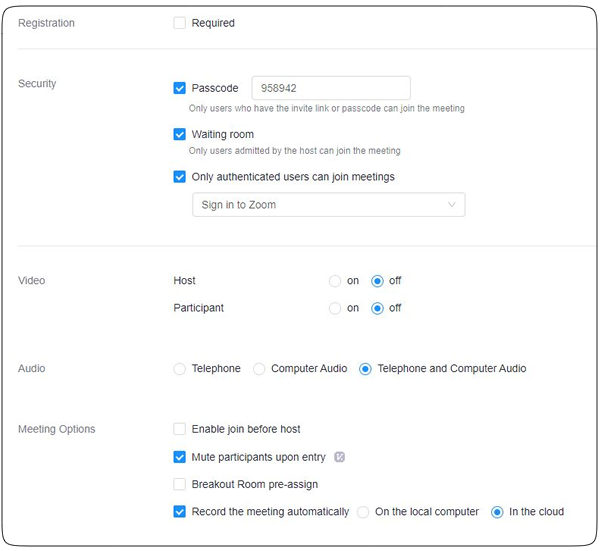
- Do not select Registration. You may only consider this option for students to sign up for office hours meetings.
- Under Security, we recommend leaving the default passcode or setting a new passcode. You may enable "waiting room" and "only authenticated users can join meetings" for extra security.
- Under Video, make any changes as desired.
- Under Audio, we recommend leaving the default settings(Telephone and Computer Audio).
- Under Meeting Options, we recommend selecting:
- Mute participants upon entry.
- Record the meeting automatically to the cloud. (Required for Panopto integration)
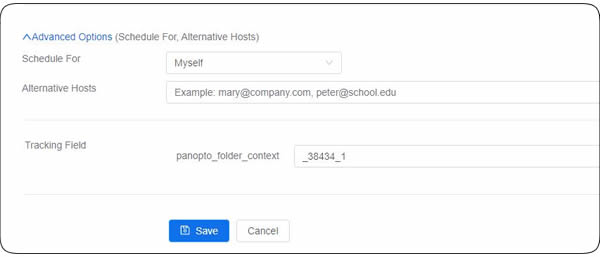
- Under Advanced Options, you may add an alternative host if needed.
- Click on Save to schedule this session.
Note: There are two requirements for the Panopto integration: 1. schedule your Zoom meetings within your Blackboard course and 2. record the meetings to the cloud. For more information, please refer to the Panopto Integration.